Thursday, March 29, 2012

Ammonia Aromas

3/26/12
Whoops! I thought I had already posted about this so I'm sorry it's late D: This week Dr. Kirchman and I took a hiatus from computer work and did some work in the prep-lab. The prep-lab is where specimens are stuffed and bones are cleaned until they have been perfectly preserved. To get our specimens of choice (bird skeletons) Dr. Kirchman and I got to use the special elevators that went down to the basement to which your average Joe did not have access. In the big freezer (which was kept at a cool 4 degrees Celsius) I came face to face with a badger and a coyote carcass as Dr. Kirchman and I dragged out a plastic box and removed some bird skeletons. We brought the skeletons back to the prep-lab where we donned some gloves and got to work.
First, Dr. Kirchman explained to me how a bird became a skeleton in the lab. I had assumed that some type of liquid dissolved all the tissue on the bird, but I was pretty far off base. It turns out that a type of beetle picks the bones clean, and NYSM has a "bug box" where they put the specimens they want to turn into skeletons. If the temperature is not too cold, the bugs will hop right to work and can turn a bird into a pile of bones in about three days. What we  had to do in the prep-lab was take these bones and remove all the bugs that had remained with the bird. The skeletons were placed in the freezer so that the bugs would freeze. Some of the bones were very small, so we had to sift through the bugs with tweezers and pick out the smaller bones. The toe bones were difficult to spot along with the little rings that were sections of the trachea of the bird. Unlike humans, birds' tracheas sometimes ossify which means that the tissue that makes up the trachea is replaced with bone. All the bird bones we sorted were placed in their own jars, each jar corresponding with the size of the bird. I then filled up the jar 80% of the way with water and the rest of the jar with an ammonia solution. In a couple weeks, the skeletons will be ready to go wherever their travels take them.
I had a lot of fun this week besides the smelliness of the bird skeletons and ammonia and got another lesson on keeping careful records in the lab. Each bird skeleton had a metal tag (so the bugs wouldn't eat it) with an identification number on it. The metal tag was taped to the jar the bird skeleton was placed in and there was a corresponding paper card with all the bird's information on it ready to be attached to the skeleton when it is removed from the jar. I am not quite sure what we are doing next week, but it is possibly more computer work as we dive back into the rail project.

Tuesday, March 20, 2012

Graphing Greatness

3/19/12
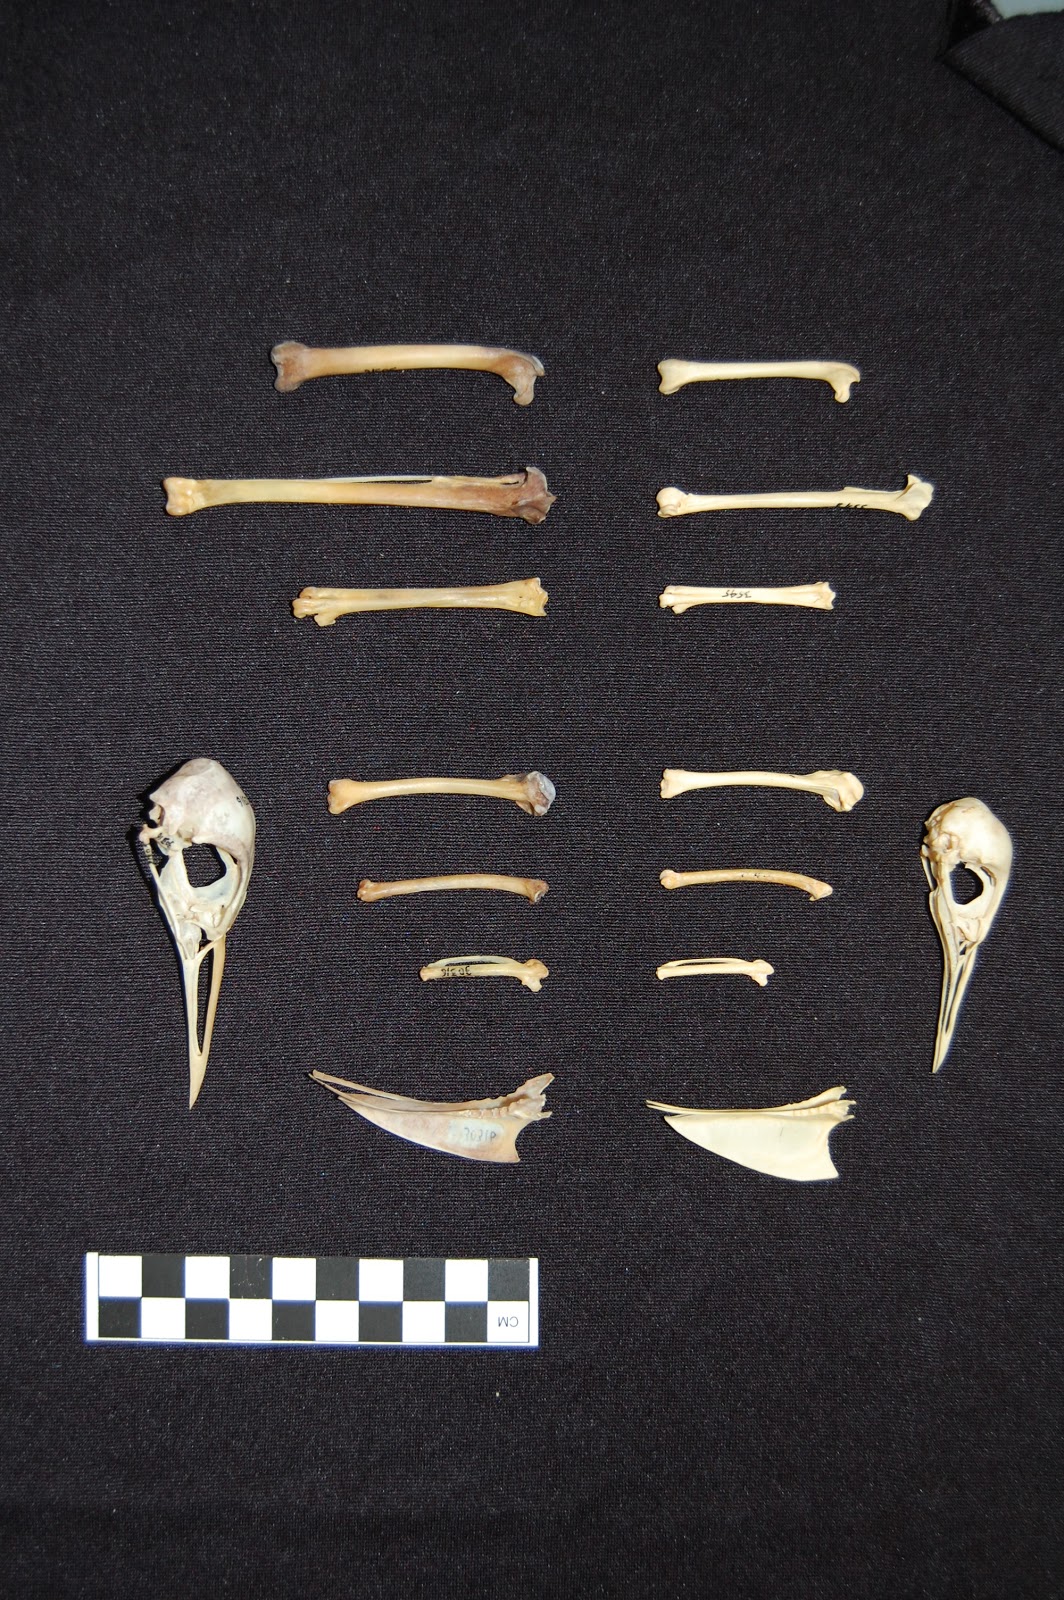
Today was more computer work, but not with DNA. Over break, Dr. Kirchman had gone to NYC (I think :D) where the rail bird samples are kept and took some measurements of skeletons. While in the lab, I took all the different measurements for four different species and found the averages of each measurement for males and females separately. Then I made a big table which may seem easy, but it took up the whole time at the internship. The tables included a bird we knew was flightless and a bird we knew could fly along with two other birds. From these measurements, we could make a pretty good guess that one of the other birds was flightless because its measurements were similar to those of the flightless bird. As you can see on the picture on the right, the bird on the left has very large leg bones in comparison to the other bird, but their wing bones are fairly similar in length. This implies that the bird on the left is used to using its legs more than the bird on the right. Another clue that implies the bird on the left does not often fly is that its sternum (the bone that looks like a triangle) is very skinny. The thickness of the sternum was one of the measurement I recorded for our table and it shows how many flight muscles the bird has. The bird on the right is smaller that the bird on the left, and yet its sternum is larger, implying it has more flight muscles than the bigger bird. Therefore, the bird on the left probably roamed the ground rather than the skies.

Monday, February 27, 2012

Confusing Computers

2/27/12
Today Dr. Kirchman did not work in the lab, but on his computer. The DNA we had sent off was back and sequenced so we spent the day cleaning up the data. To sequence DNA, a fluorescent dye is given to each nucleotide. A computer measures the wavelength each nucleotide produces, and using these wavelengths, can determine the nucleotide that goes with the corresponding color. Primers run in opposite directions that read the DNA sequence. Two primers are used because it takes a little while for a primer to get going so the wavelengths of the nucleotides are really unclear in the beginning. Therefore, if you have two primers that are unclear in the beginning, but are clear at the end and they run in opposite directions, you will hopefully be able to get a clear idea of what the nucleotides are.  However, since our DNA samples of the rail birds were so small, the quality of our DNA wasn't too great, leading to the wavelengths of the nucleotides looking a bit like this:

when in a perfect world, they should look like this:

Basically, what I did today was edit the base pairs. When the computer cannot recognize whether the wavelength is a C or a G, there are other letters (for example R, K, and W) that represent a nucleotide that can be a C or a G or an A or a G. I went through the DNA and tried to make my best guess about what nucleotide matched the wavelength based on the prettier looking primer. Sometimes both wavelengths were messy and had double peaks really close to one another in which case, I would use one of the letters that represented that the exact nucleotide was unclear.
After going through all the base pairs, I then had to cut off the primers at the ends of the section of DNA. I did this by taking the sequenced primers and having the computer match them up at the ends of the sequence. I then simply removed the bases that overlapped with the primer. Lucky for me, the four DNA sequences I did were relatively clean and the section of DNA that Dr. Kirchman and I are using to examine the rail birds is relatively small. I am not going through the entire rail genome (which would take forever to do), but simply a small section of the DNA. Thankfully, I also did an okay job of my DNA cleaning up skills because when Dr. Kirchman and I quickly looked at the sequences, the nucleotides from the rail birds all pretty much matched up. Next week I will not be seeing Dr. Kirchman since it will be spring break, but he hopes to take a closer look at the rail DNA while I am gone and start analyzing it.

Tuesday, February 14, 2012

deceased downy ducks

2/13/12
Today, Dr. Kirchman and I spent a fun day in the range (where they keep the stuffed animals and skeletons... and where my emu friend is located) rather than the lab. Dr. Kirchman was going to lecture for a group of ornithology students from Bard College and show them some bird species requested by their professor. Dr. Kirchman took me to the range and showed me where they kept the birds for teaching lessons. Faced with 5 massive metal cabinets, a stepstool, and a piece of paper with about 25 different birds on it, I was off to the races as Dr. Kirchman went to go get passes for when the students came.
All I can say is thank goodness the cabinets were labeled! I slowly made my way down the list, straining to read little tags on the birds' feet and then trying to find the common name to match the one on the sheet rather than the scientific name. Luckily, some common sense came in handy while faced with a giant row of stuffed birds with an overwhelming number of tags in small print. Using my deductive reasoning skills, I was able to determine that when I was looking for a 'purple finch' I should look for a purple bird. I am proud to say that when Dr. Kirchman came back, I had found all the birds on the list but two, one of which was not in the collection, and the other, the ruddy duck, had been mounted on a platform right across from where I was working and had literally been staring me in the face. After moving my emu friend onto a table to create a little more space in the range, Dr. Kirchman showed me a hummingbird skeleton. It was amazing to see how tiny the bones were, and the only larger bones were the skull and the sternum. 
While waiting for the students to arrive, Dr. Kirchman gave me two articles to read. I found one really interesting on climate change and how species were forced to adapt much more quickly, but the other article went over my head and before I could finish, the Bard students arrived. I was introduced to the professor, but while we were waiting in the lobby for some lollygagging students, I ran out of time and had to leave before I could hear Dr. Kirchman's lecture.
Next week is Presidents Day, so Dr. Kirchman and I will not meet, but Dr. Kirchman is going to send our rail DNA to be sequenced and I will have some computer work when I next see Dr. Kirchman as we approach our moment of truth in the rail project.

Monday, February 6, 2012

Reading post!

I was given this reading over Thanksgiving break, so I'm not quite sure what to put as the date (sorry Mr. Calos!)
Anyway, when I went to NYSM over Thanksgiving break, Dr. Kirchman gave me an article that he and some of his peers had written about the North American ivory-billed woodpeckers.
I'm not quite sure how to get the reading on here, but here is a link: http://www.ncbi.nlm.nih.gov/pmc/articles/PMC1686174/
Though I admit that some of  the vocabulary went over my head, I found the article to be interesting as well as informative overall. Basically Dr. Kirchman and his colleagues used mitochondrial DNA to compare the ivory-billed woodpeckers and Cuban woodpeckers which are very similar to the ivory-billed.  When Dr. Kirchman decoded the DNA, however, it was found that the two species of woodpecker had split off in the Mid-Pleistocene (more than one million years ago). The North American ivory-billed woodpecker was thought to be extinct until there were reported sightings of the bird in 2005, and by decoding the DNA in this experiment, Dr. Kirchman hoped to create a foundation that could test whether the sighted bird was really an ivory-billed woodpecker by comparing the DNA of a dropped feather or feces sample to his DNA sequence. There were no conclusive conformations of the ivory-billed woodpecker sighting, though, and no feces samples or feather were ever found to confirm a positive match.
<-- woodpecker :)

Gels and pipet tips and sunburns (oh my!)

2/6/12
Today I had a lot of fun in the lab. Dr. Kirchman started off by telling me about another PCR he had run. In order to sequence the DNA, we are sending only the section of the DNA that we need to be sequenced rather than the whole thing. However, we need to make sure that this section of DNA is in good enough quality to be sequenced. Dr. Kirchman tested some of the PCR product and while there was some DNA there, it was very faint and not a bright band of good quality DNA. Today, we ran a larger amount of the PCR product (20 microliters) through a gel in order to hopefully get better quality DNA. This was no ordinary gel though. This was a gel that my own two hands created without Dr. Kirchman even in the lab with me :D I even avoided microwave explosions and air bubbles in my gel, and was deemed worthy of a thumbs up by Dr. Kirchman thanks to my nice work. While Dr. Kirchman quickly loaded some DNA samples from our latest three PCRs (choosing the samples with the highest quality DNA), I restocked the boxes that held pipet tips, improving my hand eye coordination in the process (I've noticed a trend where everything that has to do with DNA is usually tiny).
Then came the really fun part. After running the DNA through my gel, Dr. Kirchman and I used the big machine that produced ultraviolet light (that's where I got the pictures of the previous PCR's a couple posts below) to cut out the DNA from the gel. While I didn't quite have the hand eye coordination to participate (as I told Dr. Kirchman, I was never good at the game Operation as a kid) I donned a pair of protective goggles and stared captivated at the glowing strips of DNA along with how easy Dr. Kirchman made it seem to cut out minuscule blocks of DNA. Dr. Kirchman had to be very careful while cutting out the DNA, however, and make sure his sleeves and gloves were covering his skin, because it is possible for the UV rays to give you a sunburn.
After cutting out the DNA strips, Dr. Kirchman and I used a kit to clean up the DNA, or at least started to use the kit until we ran out of time. We first had to incubate the blocks of DNA and a mixture from the kit in order to melt down the gel.  The blocks of DNA were put in test tubes with 150 microliters of the mixture and then put in a little boat-type tray that would float in a machine that would keep the water at 50 degrees celcius. Special tubes that come with the kit contain filters that contain things that will cause the DNA to bind  to them, but allow the other stuff to filter through. Hopefully, when we are done with the kit, we will be left with some good quality DNA ready to be sequenced.

Long weekend!

1/30/12
Today was a long weekend and I did not go to NYSM :(

Monday, January 23, 2012

AHHH overwhelmingness in the lab :)

1/23/12
I still keep forgetting that it is 2012 :) Anyway, there were luckily no transportation mishaps for me today and the shuttle ride to and from the internship went smoothly (hurrah!). When I got to NYSM, Dr. Kirchman and I quickly jumped into the lab and I got to make another gel for another gel for a PCR. Sadly, me being a newbie, something had to go wrong. I'm sorry I can never remember the names of anything, but the powder that mix with water which you heat up in the microwave that cools (after you throw in a mutagen) and forms the gel... well there was a microwave incident. When you heat up the powder water mixture in the microwave to get it to dissolve, it gets VERY bubbly VERY quickly. I was struggling trying to see through the microwave door and well, I allowed a little volcano to form in the microwave. After cleaning up the bubbly over spill Dr. Kirchman had me pop in a strip or two of some gel from old PCRs into the flask containing what was left of our water powder mixture. You can melt down strips like these and make an entire recycled gel if you have enough, but we just melted a couple in what was left of our mixture to create what was fairly close to the original amount. After putting a little too much of the buffer (the buffer is just water, but the really clean sciency water :D) in the gel holding device (I really couldn't tell you... i think the brand is called owl maybe?) I poured my melted water powder mixture into the container and put in a comb to make the wells in which we would put the DNA.
Since we had to wait for the gel to set, Dr. Kirchman took me to the range (where they keep all the skeletons and stuffed animals) to help him find some specimens he would be showing to a class later that day to illustrate the evolution of limbs. For example, Dr. Kirchman's friend, Joe, who also works at NYSM showed us a mole humerus. The mole's arms had adapted so that they were perfect for shoveling dirt and the humerus was at an angle so it would be easier for the mole to scoop (http://www.mnh.si.edu/mna/full_image.cfm?image_id=834 <-- mole arm :D).
After freeing an emu from a crate (with the help of a screwdriver, scissors, and wire cutters), we went back to the lab to see that our gel had turned opaque and was ready for us to place the DNA in the wells. Putting the DNA in the wells, however, takes quite a steady hand. My hands are not that steady. However, I was doing pretty well until Dr. Kirchman commented on how well I was doing. With my chest puffed out as I began to put the 7th sample of DNA in a well..... I pushed the pipet down into the bottom of the well too hard which meant the DNA couldn't come out of the pipet and when i removed the pipet the DNA splooshed everywhere but inside the gel. Whoops. Dr. Kirchman quickly whipped up another sample of that same DNA, fixed my mistake, and I finished the last two wells successfully. Overall it was a good day in the lab, mistakes and all, because practice makes perfect :). Hopefully it will just be a little more perfect next time.

Tuesday, January 17, 2012

PCR pictures :D

This is PCR 169 and it is the first PCR where we were actually able to see some nice rail DNA without the scary wiggly streaky things (possibly caused by the snow-flaky substance in the DNA). After Dr. Kirchman cleaned up the DNA removing any proteins our other materials that could have contaminated it during extraction, we were able to see the DNA even though it wasn't very pretty. The first test tube with the nicer looking DNA is a control that contains a DNA sample that we know will work to make sure that if the DNA had not shown up, it would not have been a technical error.

This is the cleaned up DNA from PCR 169. Dr. Kirchman cut out the DNA from PCR 169 from the gel and cleaned it up one last time. As you can see, it worked and the DNA is much... prettier :). The first tube is a control that is supposed to work every time, and it did. The test tubes with the very bright DNA are the tubes with the better-quality DNA.  The tube on the end separated from the others is a sample of DNA in a different gel so that we can make sure that there is not a problem with the gel that would cause a problem with the DNA.